One of the most useful features in VMware vSphere are VMware snapshots. While people love to use snapshots, VM snapshots are also something that can be confusing or easily misunderstood. This is the complete guide to VM snapshots in VMware, VMware snapshots explained in plain easy to follow language.
What is a VMware Snapshot?
A VMware snapshot is a point in time copy of your VM. This can be useful for any number of reasons, and quite honestly was way more useful in the early days of VMware vSphere.
This point in time is very important, since it is what you need to keep in mind when it comes time to either delete your snapshot (keep your changes) or revert your snapshot (discard your changes).
Many VMware administrators like to use VMware snapshots for things like testing or keeping a clean copy of a VM before changes are made.
The key thing is not taking the snapshot itself, but what you do with your snapshot when you are done with it.
Never just leave your VM snapshot open forever and ever. You are asking for trouble.
If you see issues in your environment from VMware snapshots, 9 times out of 10 they will be because a snapshot was left open in perpetuity.
Let’s take a closer look at how a VMware snapshot works before we discuss any potential benefits, drawbacks, and performance issues with VMware snapshots.
How a VM Snapshot Works
Remember, a VM snapshot is a point in time copy of your VM.
After you take the VMware snapshot, all other changes that are made to a VM are stored to a delta file. This delta file of course grows and grows as the snapshot is left open, and changes are made.
When I say changes, I don’t mean someone logging in and doing something to a VM. Every write from your snapshot forward ends up in the delta file.
Think of a VM that makes lots of transactions without intervention, like a database. All of these changes are written to this delta file.
This delta file, more importantly the size of this delta file is very important when it comes to VMware snapshots.
Beyond the delta file, there are additional files created when taking a VMware snapshot.
Drawbacks of VMware Snapshots
Now that we’ve talked about how a VMware snapshot works, let’s look at the bad part first.
The size of that delta file.
If your change goes great, fantastic! However, you now need to delete that snapshot, or keep your changes.
VMware Snapshot Performance
You would think deleting a snapshot isn’t a big deal, however all of those writes in the delta file need to be applied to your VM’s VMDKs.
This operation can be very write intensive, and depending on how many snapshots you’re deleting at the same time, and what else is happening on your datastore, you may have a bad time.
This is where you will see issues with VMware snapshot performance, not necessarily taking the snapshot or having it open, but when it comes time to delete the snapshot.
Once, I had a major storage performance issue in an environment when I was a VMware administrator, and we discovered it because snapshots were literally taking DAYS to delete. It wasn’t pretty.
The other drawback of VMware snapshots is that they are easy to forget about, which can once again lead to the first drawback.
The most useful script we had in our VMware environment was one that e-mailed us daily with a list of open snapshots in our environment so we could keep track of them before we encountered issues.
Be sure to take a look at VMware’s Snapshot best practices before using snapshots in your environment.
The biggest things from VMware’s best practices are VMware does not recommend keeping a snapshot open for more than 72 hours, and only recommends using 2-3 snapshots per VM at the same time (while the limit in vSphere is 32).
Benefits of VMware Snapshots
Some of the things we talked about sound pretty horrible, especially when it comes to the performance when deleting a VMware snapshot.
That doesn’t mean you shouldn’t use VM snapshots!
There are many good reasons to use a VMware snapshot, as much as they can be come a problem if they are ignored.
Besides having a clean copy of your VM ready to go if something goes wrong with a patch, upgrade, or test, there is one other major benefit of VMware snapshots.
Application consistency.
This is a nice way of saying that if something goes terribly wrong with your VM, things will start right up without issue should you need revert to a snapshot.
This is accomplished by quiescing or stunning the VM’s application operations when the snapshot is taken. It requires VMware Tools to be installed in the virtual machine. This stun is performed when the VM has finished current operations.
VMware Snapshot and Backups
Application consistency is great when it comes to backups. Remember, it isn’t about backup, but about recovery.
In an ideal world, we want to recover our applications in a consistent state, especially when they are applications like databases or things that are highly transactional.
What does an application consistent recovery look like?
Well, you restore your VM, you start up your vm, and it just works. That’s it.
The other type of snapshot is called crash consistent. It basically just takes a snapshot of whatever is happening on the VM at the time of the snap, and sometimes when you start the VM, it behaves like it has crashed previously.
Think filesystem checks when you start the VM. Not necessarily a bad thing, but it can take some time.
You may lose some data from transactions that aren’t finished.
These things also mean you blow your RTO out of the water if you’re going to take longer to recover because of these issues, and which is never a good thing.
Time is of the essence when it comes to recovering a VM.
Minimizing the Impact of VMware Snapshots During Backups
So let’s think about this. Backing up your VMs in an application consistent manner, which is a really great idea.
What actually happens to achieve this?
Your backup tool opens a VMware snapshot. Your backup runs. Your backup tool deletes the snapshot, which is a write intensive operation.
Now multiply this by how many VMs you have in your environment.
See where I’m going with this? Especially with highly transactional VMs you’re going to ask for issues.
I managed a MASSIVE vSphere environment. The last thing I wanted to do was architect my environment to be able to survive a backup window, but nonetheless we had to do it.
I can’t tell you the countless hours we spent so that our production environment wouldn’t be decimated during a backup, especially since we were a global company and it was always 8PM somewhere.
Sad but true, these are things you need to consider as a vSphere architect.
Disclaimer: I’m a Senior Technologist at Veeam Software. This isn’t a sales pitch as much as the reason I decided I wanted to work for Veeam in the first place.
There’s a better way to have the best of both worlds, fast application consistent backups, and to avoid the performance issues VMware snapshots can bring to the table in some cases.
Veeam’s Backup from Storage Snapshots.
It’s genius, and one of the reasons why I went to work there.
The VMware snapshot is only open long enough for the storage snapshot to take place. In the case of NetApp (yeah, I worked there too), it is near instantaneous.
The backup itself is then done from the storage snapshot, and you can even set the backup to be preformed from the snapshot you’ve replicated to your secondary array.
Fast application consistent backups with no performance issues.
No more work talk, I promise!
Now that we’ve talked quite a bit about VMware snapshots, let’s take a closer look at how to take a Snapshot in VMware.
How to Take a Snapshot in VMware (and Using VMware Snapshot Manager)
Taking a snapshot is quite easy in VMware. We’re going to take a look at how to take a VM snapshot with the vSphere client.
Of course, you can also use PowerCLI to take a VMware snapshot.
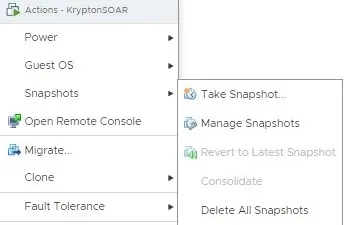
First, right click the VM you would like to Snapshot, and select Snapshot from the menu, you will see several options:
To take a snapshot, select Take Snapshot.
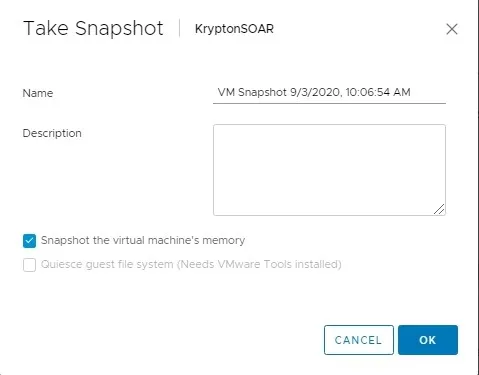
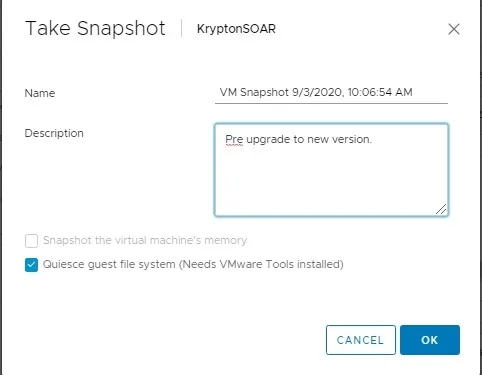
Next you will have the ability to name your snapshot and give it a description. Make sure to put something that makes sense here, so you know the purpose of the snapshot.
Why is quiesce guest file system greyed out?
Great question! Quiesce guest file system is greyed out because Snapshot the virtual machine’s memory is selected.
To use VMware Tools to quiesce the guest file system, uncheck Snapshot the virtual machine’s memory.
If you are quiescing the guest file system, you don’t need to worry about the contents of memory.
After you uncheck that, you will be able to select quiesce guest file system.
Using VMware Snapshot Manager
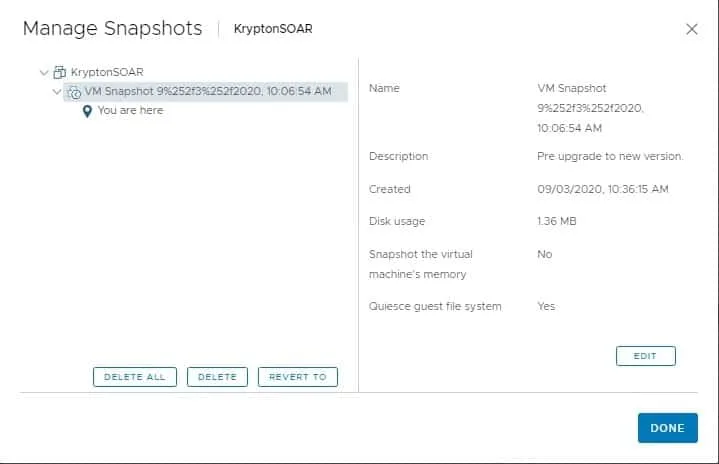
After you have taken your snapshot, you can then use VMware snapshot manager. From Snapshots in the VM menu, simply click Manage Snapshots from the menu.
From VMware Snapshot Manager, you have th ability to see more information on each of your snapshots, and manage them.
Yes, you can even have multiple snapshots! A snapshot of a snapshot. It is a bit like inception. You’ll also notice that you could have preformed VMware snapshot operations from the Snapshots menu directly.
Snapshot manager is nice because it gives you more information about the snapshot or snapshots, such as name, date, notes, and the size of the snapshot.
Now let’s talk about the VMware snapshot operations and what they mean. The snapshot operations are:
- Delete
- Revert
Delete a VMware Snapshot
By deleting a VMware snapshot, you are doing just that, deleting it. vCenter will delete the snapshot, however it will write all of the information from the delta file to the VMDK. This is a bit of a simplification of the process.
You may also hear see this process called VMware Snapshot Consolidation.
As I mentioned before, this process is resource intensive and may cause performance degradation. VMware recommends not leaving a snapshot open for more than 72 hours, and depending on your application that could even be quite a bit of data to consolidate.
Revert to a VMware Snapshot
In the case of reverting to a VMware snapshot, we are going back to the original VM state. This means we are basically throwing away the changes from when you took the snapshot.
There is not the performance penalty you would see with a snapshot delete or consolidating the snapshots in this case.
This just means you are right back to where you started from, which could of course be a great thing if what you were testing didn’t work out.
VMware Snapshots Delete vs Revert
This is one of these things that can be a bit confusing, so let’s break these things down one more time.
The trick is to think of things in terms of the point in time copy of your VM, not the changes that have been made to your VM after the snapshot was taken.
Deleting a VMware snapshot deletes the point in time copy of your VM. All changes that you have made to your VM since the snapshot was taken stay with your VM. You keep your changes from that point in time.
Reverting a VMware snapshot goes back to the point in time copy of your VM. All changes that you made are gone and you are back to where you started from. You discard your changes from that point in time.
VMware Snapshots Explained
Let’s briefly recap what we’ve covered about VMware snapshots.
- A VM snapshot is a way to make point in time copy of your VM
- Be careful of how long you keep a snapshot open, especially if you plan on deleting the snapshot later.
- Deleting a virtual machine snapshot deletes the point in time from which you started your snapshot. All changes are kept and written to the virtual machine, which is resource intensive.
- Restoring a virtual machine snapshot throws away your changes, and brings you back to the point in time you started from.
The most important thing when it comes to VMware snapshots is to keep track of them in your environment to make sure you do not have issues later on. Be sure to give each snapshot a clear name and description, and consider monitoring them.

Melissa is an Independent Technology Analyst & Content Creator, focused on IT infrastructure and information security. She is a VMware Certified Design Expert (VCDX-236) and has spent her career focused on the full IT infrastructure stack.


