The time has come once again to update a expired VMware vSphere license. Personally, I have a bad habit if never bothering to add licenses in a lab environment until they expire. If we are talking about a production environment, I always make sure licenses are verified during the testing and validation phase of the project.
If not, have no fear, I am about to show you how to update an expired vSphere license using the vSphere Web Client.
This how to guide will work for VMware vSphere products like vCenter, ESXi, and vSAN. You can also use this method to put assign VMware vSphere licensees during initial deployment, or before they expire.
(If you are still using the VMware vSphere C# client and need to update an expired license, be sure to check out this article.)
Updating an Expired vSphere License
In this case, my VMware vCenter Server license expired. If your vCenter Server license is expired, believe me, you will know. You will not able to do things like add a host to vCenter, as illustrated below.
This article will show you how to update a license in the VMware vSphere Web Client, and help you figure out one of the most commonly encountered issues when doing so. If you’re looking information on how to update the license using the C# client, make sure to take a look at this post.
Updating an Expired vSphere License in the vSphere Client (vSphere 6.x +)
If you are using the vSphere Client, which is the HTML5 based client included in vSphere 6.x and higher, here is a demo video showing you how to update assign your licenses.
The vSphere Client is the way forward, so be sure to check it out if you have not already!
This video covers how to add licenses and assign them to vCenter, ESXi, and vSAN
Adding Licenses to vCenter in the vSphere Web Client
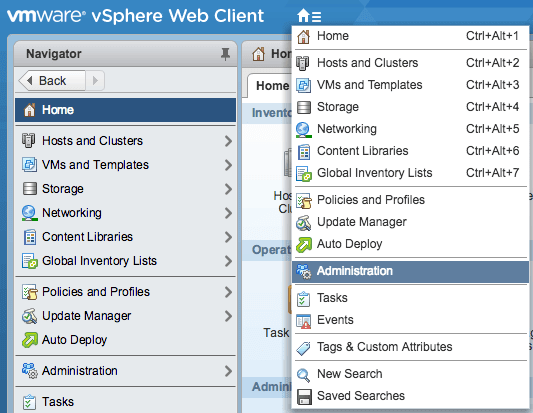
The first step I always like to do is add all the licenses I need to vCenter. We will start by logging into vCenter. Then, click the home button and select Administration.
Now, click on Licenses, then click the green plus button I’ve circled to add a new license.
Now, here’s the tricky part: you need to actually, manually type out your license key! Otherwise, you may get the “Cannot add the following license keys, because their format is incorrect.” error message.
Perhaps this is a fluke of using a Mac (probably), but I encounter this every single time without fail. I try to take the dashes out, yet it still tells me “Cannot add the following license keys, because their format is incorrect.”.
This is slightly different than the C# client, where you will only see the first part of the key. Type it in, and without fail, you’re good to go. In case you were wondering, you need to type the dashes too. The next screen you see will tell you to name your license.
Assigning a License to vCenter or ESXi Hosts
Now, since we have entered our vSphere licenses into vCenter, we just need to assign the license to vCenter. Click the Assets tab, and vCenter will be selected by default.
If you needed to assign a license to an ESXi host, you would do it the same exact way, just selecting Hosts on the Assets tab. Click the Assign License button. As you can see, our vCenter server license is expired. Oops!
As you can see, our vCenter license is already selected for us, even though I had several other types of licenses in the system, such as ESXi licenses. You can also add licenses to other vSphere products from this same screen. Click OK.
That’s it! Now you are ready to go back to whatever you were doing before you realized your vCenter license was expired. Remember, this process will also work for your ESXi hosts in case those licenses have expired too.
If you want to learn more about the newest vSphere host client for accessing hosts directly based on HTML5, be sure to look at my favorite feature of it.
Assigning a vSAN License
I got bitten the other day because I forgot to assign a vSAN license. Oops! I learned something very important – you do not assign a vSAN license like you would a vCenter or ESXi host license.
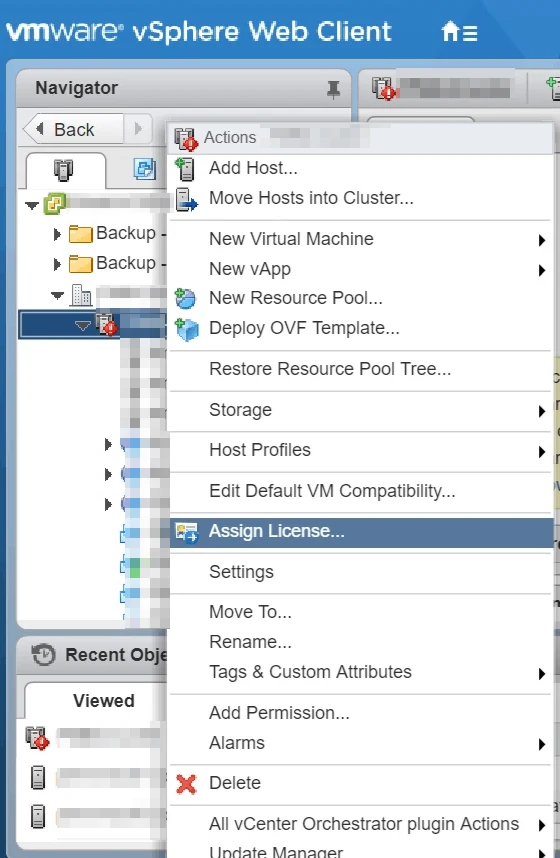
Here is how you assign a vSAN license step by step in the vSphere Web Client. First, you must install your vSAN license. You can do that exactly how you installed your vCenter license by using the Administration pane. After you have entered your vSAN license key,right click the vSAN cluster in hosts and clusters view, then select Assign License.
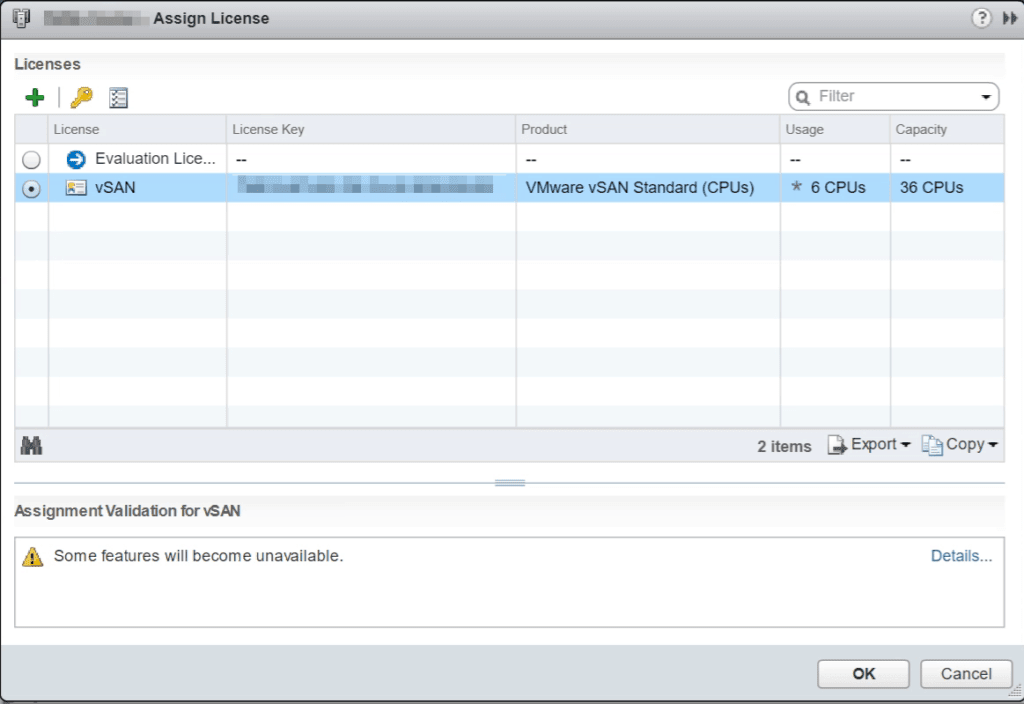
Then you will see the following window. Simply select the vSAN license you have already entered.
If you forgot to enter your vSAN license when you were entering your ESXi and vCenter licenses, you can hit the green plus sign to enter the vSAN license here. Click OK, and vSAN is once again licensed.
Always Add vSphere Licenses During the Build Process (and Validate Them!)
It is very important to ensure adding licenses is part of your vSphere build process, and checked and double checked during the validation process of your new vSphere environment.
Need to update your vSphere Licenses? No matter what version of vSphere you are running, here is how:
How to Update a VMware License in the vSphere Client (HTML5 Client)
How to Update an Expired VMware vSphere License in the vSphere Web Client (Flash Client)
How to Update an Expired vCenter Server License in the C# Client (Thick Client)
While we illustrated it is quick and easy to update vSphere licenses, we still do not ever want to be in this position in a production environment. We will not be able to do things like re-connect or add hosts to vCenter, or start virtual machines. This can cause a service disruption to those who rely on our VMware vSphere environment.

Melissa is an Independent Technology Analyst & Content Creator, focused on IT infrastructure and information security. She is a VMware Certified Design Expert (VCDX-236) and has spent her career focused on the full IT infrastructure stack.


