Another round of vSphere upgrades are upon us, and vSphere brings some changes with the introduction of vSphere Lifecycle Manager. vSphere 7 brings a whole slew of new features, especially when it comes to managing the lifecycle of your vSphere environment. As of vSphere 7, vSphere Update Manager no longer exists and vSphere Lifecycle Manager is the new tool will use to manage the lifecycle of our ESXi hosts.
Why The Move to vSphere Lifecycle Manager?
Great question! While I don’t work for VMware, I have worked with VMware for over a decade. One thing we have seen with each and every vSphere release is added features and functionality when it comes to the ability to mange your environment.
A big part of managing your environment is ESXi patches and upgrades. While this was easy to do with vSphere Update Manager, it will get even easier with vSphere Lifecycle Manager.
Here are all of the ESXi versions you can upgrade directly to ESXi 7.
- Upgrade ESXi 6.0 U3 to ESXi 7
- Upgrade ESXi 6.5, 6.5 U1, 6.5 U2, and 6.5 U3 to ESXi 7
- Upgrade ESXi 6.7 U1, 6.7 U3, and 6.7 U3 to ESXi 7
For earlier ESXi versions, you need to get to one of the versions listed above before you can upgrade to ESXi 7.
About vSphere Lifecycle Manager
vSphere Lifecycle Manager in vSphere 7 is all about simplicity. We are going to begin to mange ESXi images at the cluster level. By tying the ESXi image to the cluster, we can be assured that all hosts are running the same image. I was always a fan of tying my Baseline to my vSphere cluster to achieve something similar in Update Manager, but this brings things to a whole new level.
Before we begin to realize all of the great features vSphere Lifecycle Manager brings to the table, we have to get to ESXi 7.
To do this, we will be performing an upgrade very similar to how we would in Update Manager. It is what we do after that changes the game.
After we get our hosts onto ESXi7, we will use Lifecycle Manager to create a cluster image.
Preparing for Your ESXi 7 Upgrade
Before you upgrade ESXi with Lifecycle Manger, there a few things to remember.
- Your vCenter Server should be running vSphere 7
- You should check the VMware Compatibility Guide to ensure your hardware is compatible with ESXi 7, and any third party products your vSphere environment touches are compatible with ESXi 7.
- You should check the VMware Interoperability Matrix to ensure ESXi 7 is compatible with other VMware products you use.
Then, you of course will need to download your ESXi ISO. The ESXi 7 download link is right here.
How to Upgrade ESXi 6.7 to 7
If you are used to upgrading with vSphere Update Manager, your upgrade to ESXi 7 will not be much different at all.
It is what you will do after the upgrade that changes the course of your ESXi Lifecycle Management.
We are going to walk through to get your ESXi hosts onto vSphere 7, and how to cover to the new cluster based image management model.
Creating a New Baseline
If you are an Update Manager user, this is the last time you will create a baseline for your ESXi hosts.
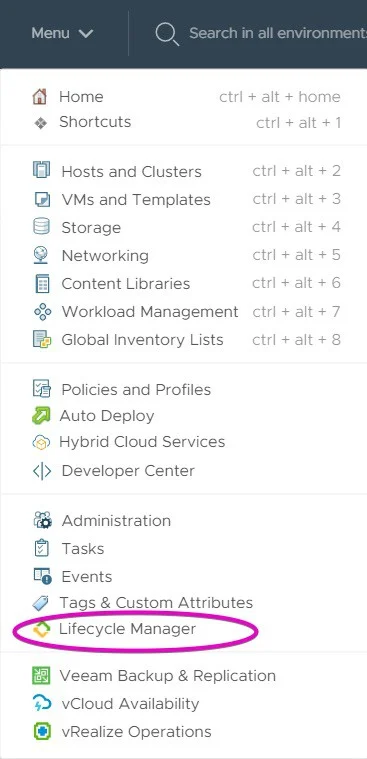
To begin this process, first you need to access vSphere Lifecycle Manager. There are a couple of different ways to do this, but I like to click on Menu after I have logged into vCenter and access it that way.
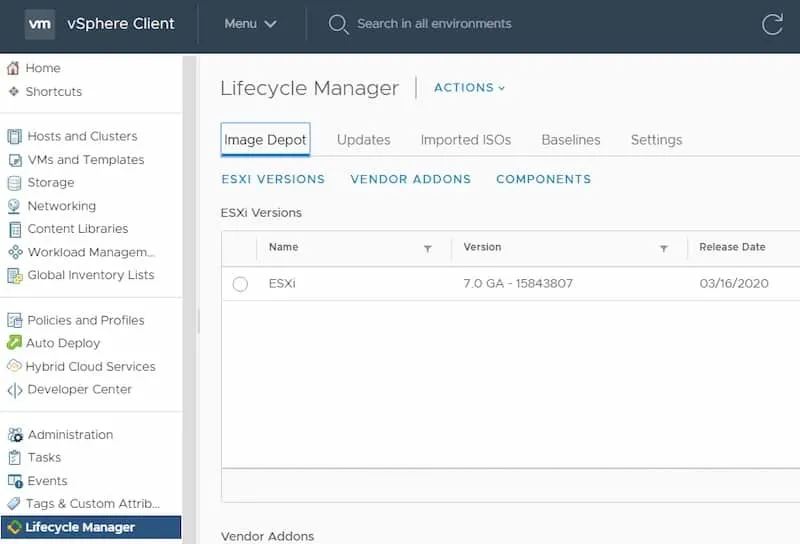
At first glance, things really do look quite a bit like update manager. Here’s what you see after you load Lifecycle Manager.
We can do quite a bit with Lifecycle Manager. Here are some of the basic things we can do in our environment.
 For our upgrade to vSphere 7, we are concerned with two things: Imported ISOs and Baselines.
Import the ESXi ISO
To import your ESXi 7 ISO, click on Imported ISOs, then Import ISO.
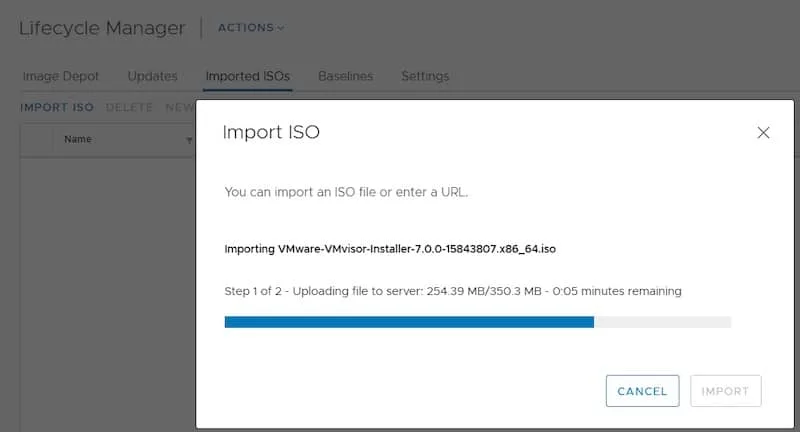 After your ISO has been imported, then head on over to baselines, and select Create New Baseline.
Name your baseline whatever you would like, but make sure it is an Upgrade baseline.
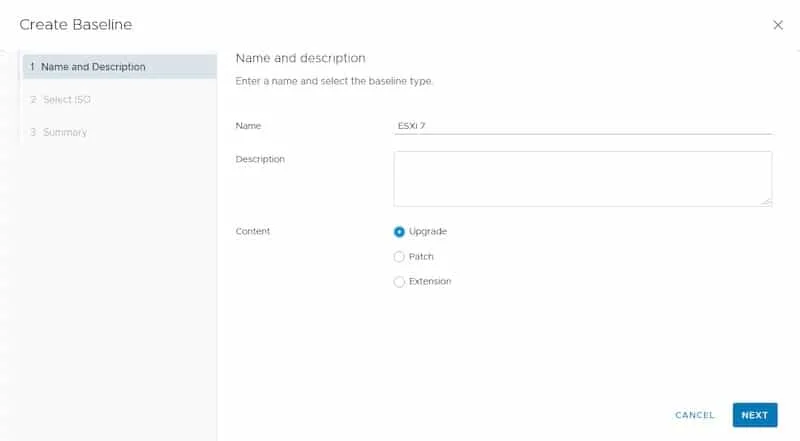 After you click Next, select the ISO you just uploaded. Then click Finish.
That’s it. We now have our baseline.
Attaching a vSphere Lifecycle Manager Baseline to a Cluster
Now, head on over to your vSphere Cluster, and the Updates tab. This is where the magic happens.
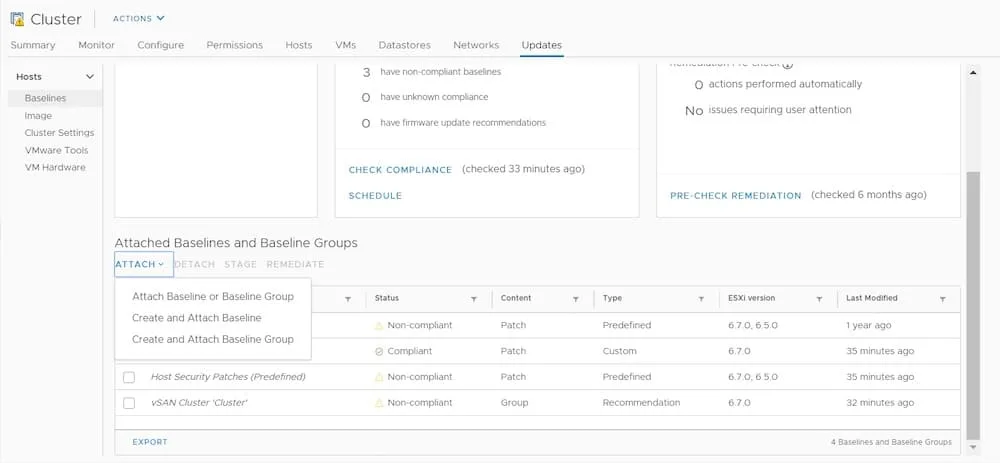
We need to attach our baseline to our cluster to upgrade it. Select Attach Baseline or Baseline Group. You could have also created the baseline here as well.
You can see my environment is a bit messy, I have a bunch of baselines from various past upgrades. After we attach our baseline there are a couple of things we need to worry about.
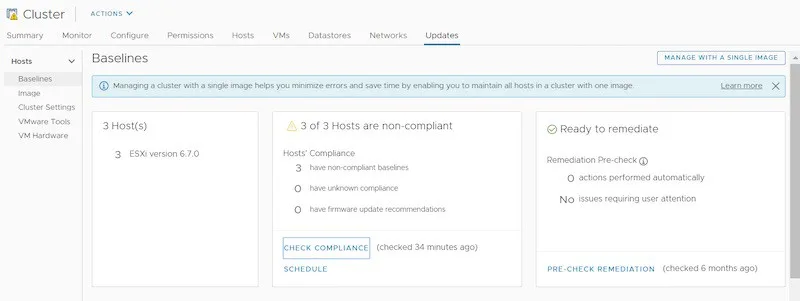
First is if our baseline is in compliance. The answer to that is going to be no, since our baseline specifies ESXi 7 and we are running ESXi 6.7.
The next is our Pre-check remediation. vSphere will check your environment and see if there are any issues before you attempt an upgrade. If there are issues, vSphere will protect you and will not let you upgrade until you have fixed them.
If everything looks good, your Lifecycle Manage will look like this:
Lifecycle Manager Fails Pre-Check Fails with Nested vSAN
Here is an example of a failed pre-check remediation:
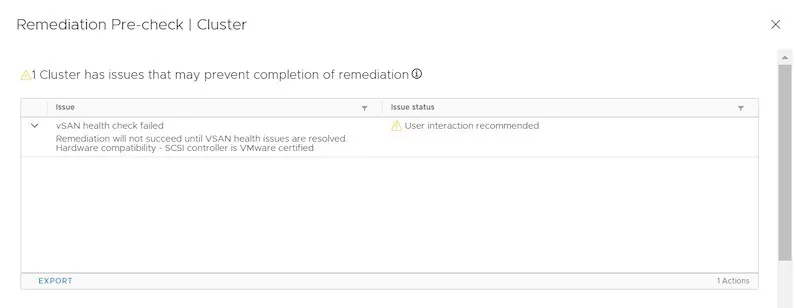 This vSAN health check failed because there was a hardware compatibility issue. Since my hosts are nested, this is expected, however we need to fix it before we can do a successful upgrade to vSphere 7.
There are a couple of ways to do this.
William Lam has a great PowerCLI method to suppress this, and Jeffrey Kusters has a great blog on how to do it via SSH to the VCSA.
Remediating Your ESXi Hosts – The ESXi 7 Upgrade
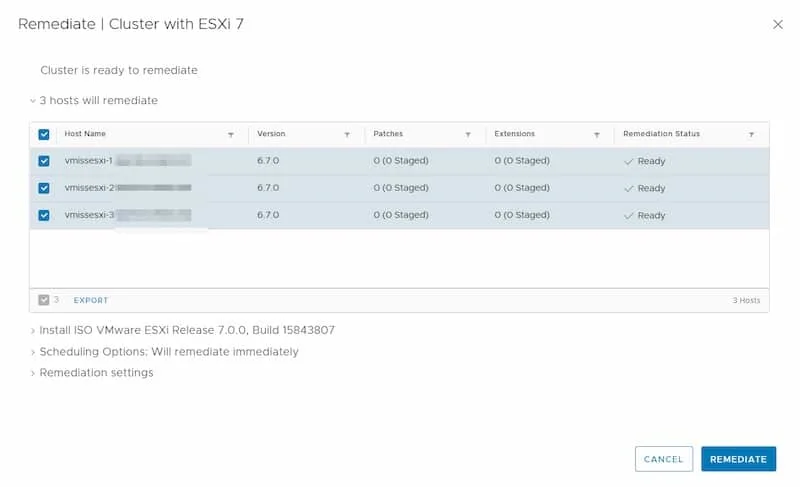
When we remediate our hosts, we are really upgrading them to ESXi 7. Simply select the baseline and click Remediate.
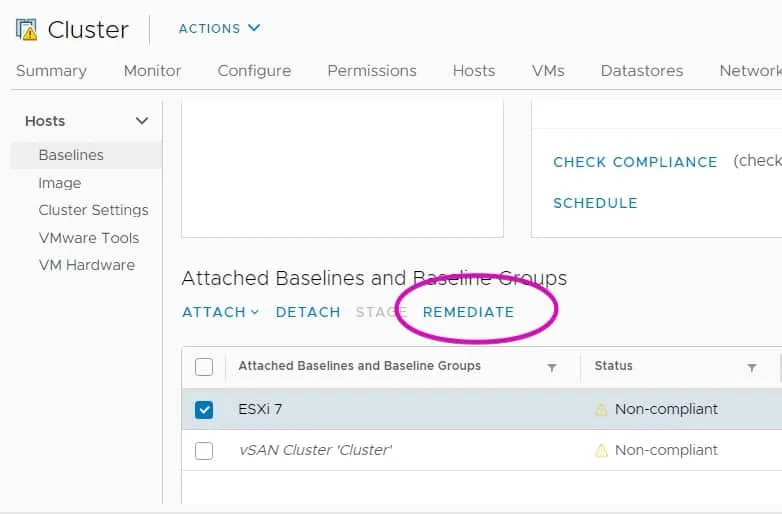 Lifecycle Manager will take a look at the hosts in your cluster one more time before it upgrades them.
Click remediate, and your upgrade to ESXi 7 will begin. Lifecycle manager will put each host in your cluster into maintenance mode and upgrade it. Once Lifecycle Manager has finished, you will see your hosts are running ESXi 7.
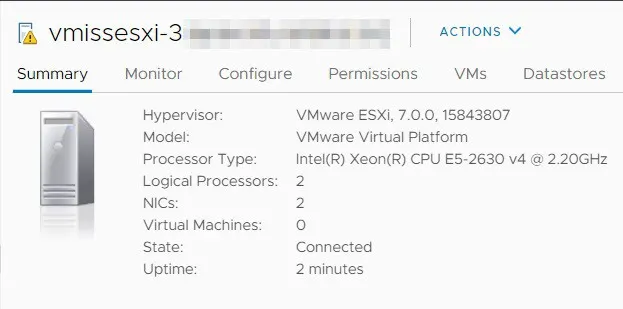 Congratulations, you are now running vSphere 7!
While you can stop right here, we really should now start to explore the new features of Lifecycle Manager, and set your cluster up for the future.
Using vSphere Lifecycle Manager Images
After your upgrade to vSphere 7, the notion of baselines as it existed in Update Manager is gone.
In vSphere Lifecycle Manager, we can use images to make sure each host in our cluster is running the exact same version of ESXi with the same components.
This image can be tailored specifically to the hardware in the cluster, and can be unique for every cluster based on the hardware with it.
This is a different way of thinking of things when it comes to ESXi images, so be sure to take a look at the official vSphere Lifecycle Manager documentation.
Remember, this is a vSphere 7 feature, so we need to get to vSphere 7 with the old baseline upgrade method before we can transition to cluster images.
Let’s go over the process for converting to this method.
The vSphere Lifecycle Manager Depot
Custom components of your vSphere Lifecycle Manager cluster image are managed from the vSphere Lifecycle Manager Depot.
The depot is accessed from the Lifecycle Management screen from the vSphere Client.
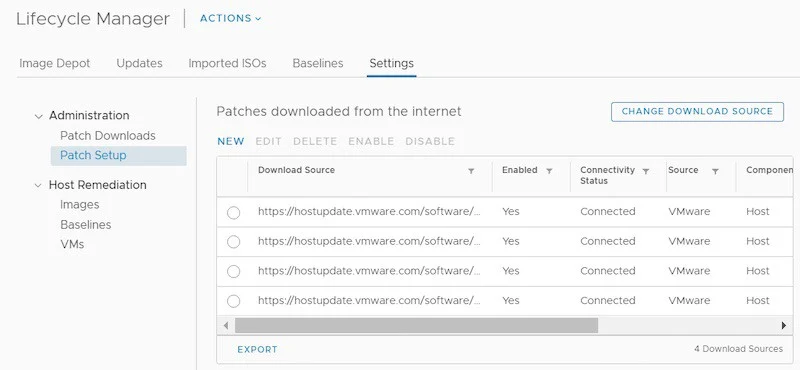
You can import ZIP files and ISOs into the Depot, or download updates.
Remember my good friend UMDS? Or the Update Manager Download Service? That is one of the key ways to get software into the Lifecycle Manager Depot.
You can also have vSphere Lifecycle Manager download patches from the internet in addition to a UMDS shared repository. This can all be configured from the Settings tab of Lifecycle Manager.
For more on getting your custom components into Lifecycle Manager, be sure to check out the official documentation.
Creating a vSphere Cluster Image
We are going to stay in the Upgrade tab of our cluster management.
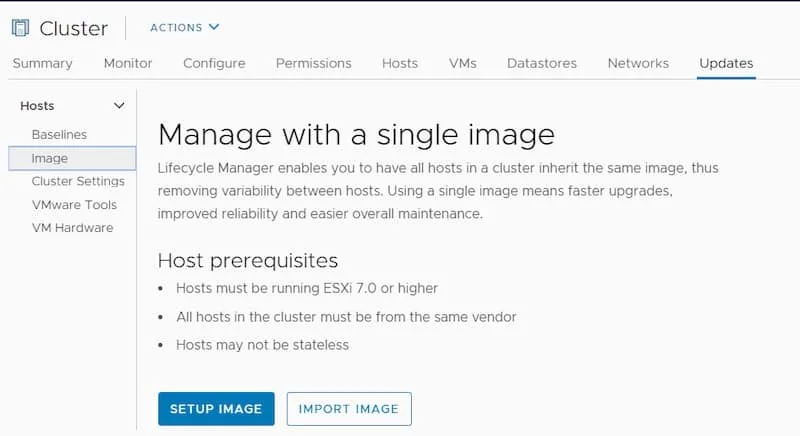
Under hosts, click Images, and this is what you will see.
See where it says Baselines above Image? After we finish this setup process, Baselines will disappear and we will have transitioned to image based management of our vSphere 7 clusters.
At this point, you can setup your own cluster image, or import an image you may have already gotten from your hardware vendor.
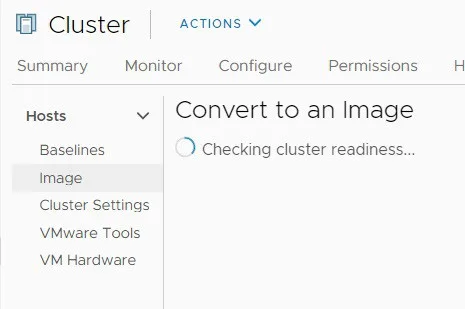
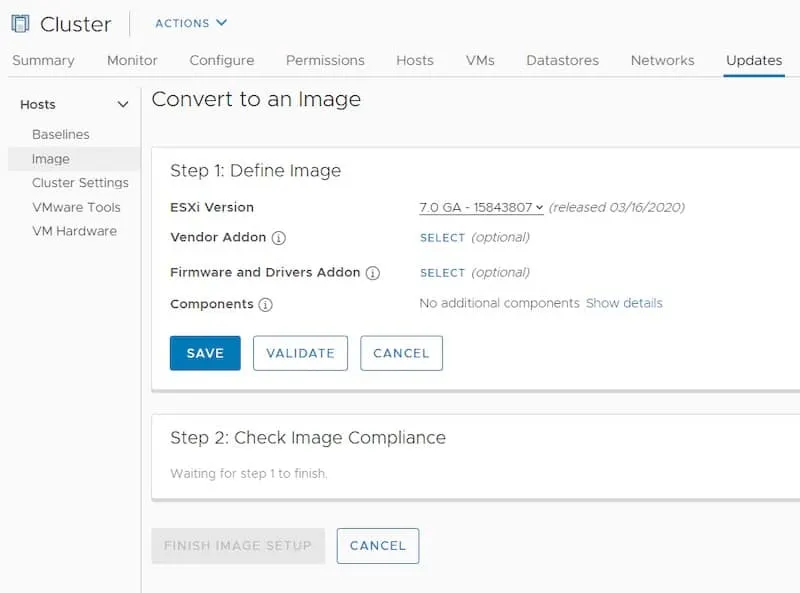
We are going to setup an image. Click Setup Image, and you will see this screen for a little while as Lifecycle Manager gets ready to transition to image based management.
Next, this is where the fun begins! This is where we can customize our ESXi cluster for our hardware.
Let’s take a good look at this screen.
- Vendor Addons are things like drivers your hardware vendor provides
- Firmware and Drivers contain firmware and drivers from your hard vendor
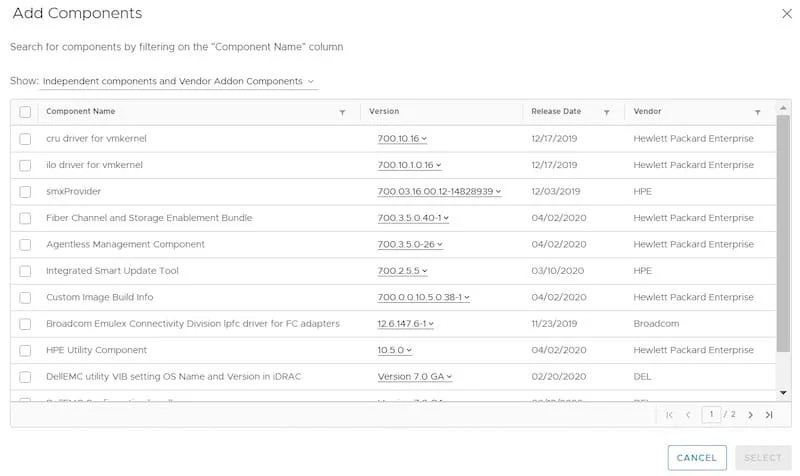
- Components are the most granular unit that can be included, it is a specific driver
It really comes down to how and what your specific hardware vendor provides for you. You can browse for components right in vSphere Lifecycle Manager like this:
These items are pulled from the vSphere Lifecycle Manager Depot that we talked about earlier.
This means that Lifecycle Manager can now handle your firmware updates for you. Pretty cool, right?
After you have added everything you need to in Step 1, click Save. You also have the option to click Validate and make sure what you have added is compatible with your environment.
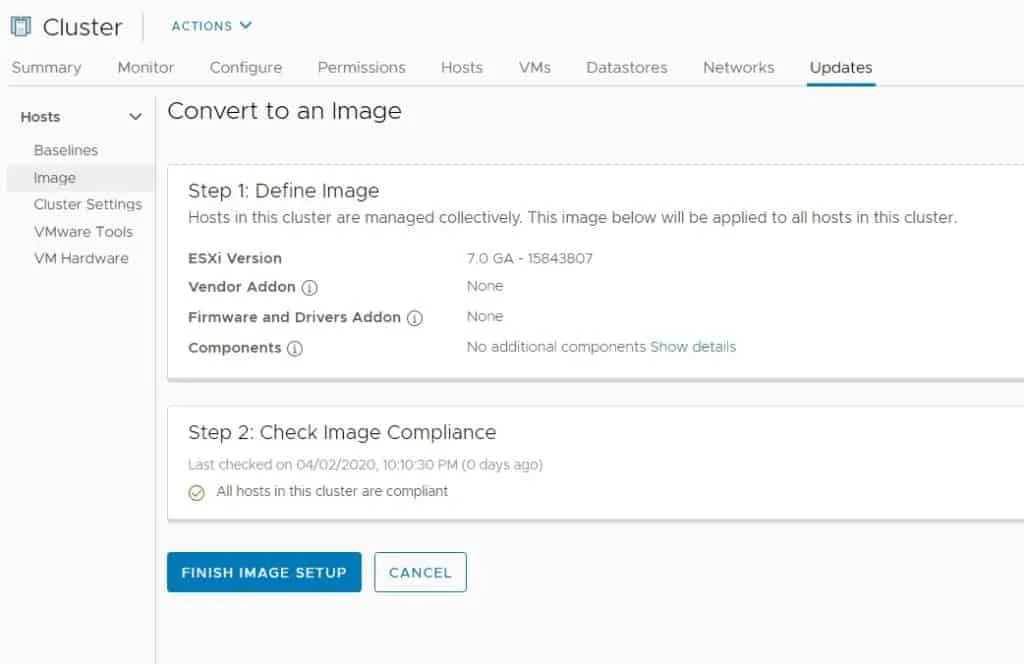
Then we will check our cluster’s compliance with the attached image.
Converting Your Cluster to a Lifecycle Manager Image
The next step is to click Finish on Image Setup. This is what will transition your vSphere cluster to this new ESXi software management method.
Click Finish Image Setup, and say goodbye to baselines.
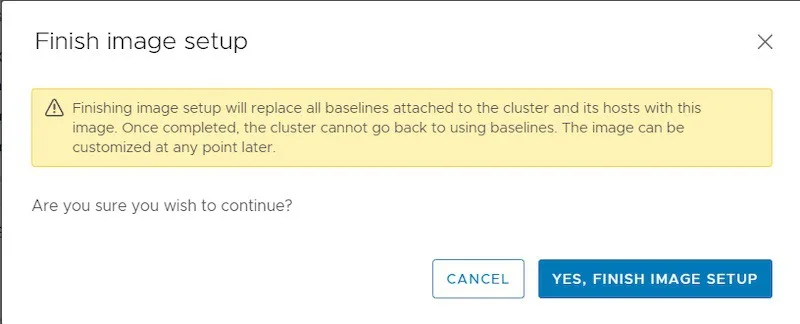 Please note that this process is permanent. Once you switch to image based ESXi management, you cannot go back to baselines like Update Manager.
Trust me, you won’t miss them. After we have finished our image setup, we now see this:
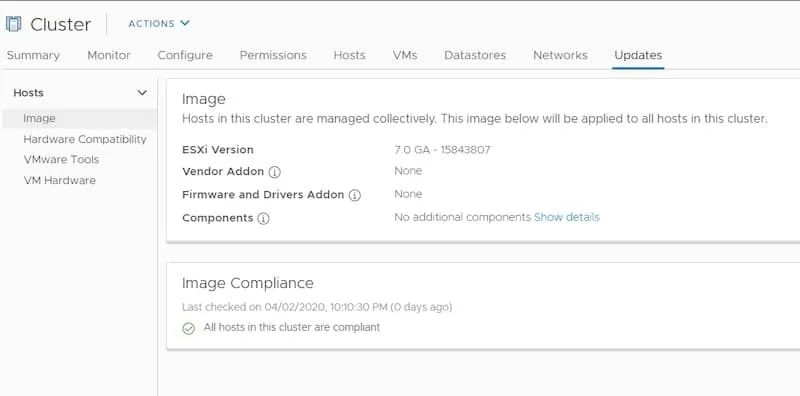 Baselines are gone, and we now have a single customized image installed on our ESXi 7 hosts.
Congratulations! You are now ready for each and every vSphere update to come.
More vSphere Lifecycle Management Features
My cluster image is pretty boring looking since my ESXi hosts are virtual, but there is one more thing I want to point out.
We have more powerful options within Lifecycle Manager if we focus on the cluster image section:
 We can export this image, or import one. We can check for recommended images, which are pre-validated images based on your hardware configuration, and last but not least, check hardware compatibility right in Lifecycle Manager.
vSphere 7’s Lifecycle Manager Transforms ESXi Upgrades
We just took a good long look at how vSphere 7’s lifecycle manager transforms ESXi upgrades.
After we preformed our final upgrade with the old baseline based method, like with vSphere Update Manager, we transitioned our cluster to use Lifecycle Manger’s cluster image based method.
The cluster image is completely customizable, or you can use a pre-validated one if your hardware vendor supplies it. You can get granular down to the individual driver level with this Lifecycle Manager image.
Then, you can make sure each and every host in your cluster is running the exact same image with ease.
Lifecycle Manger really is a powerful tool that will transform the way you think about your ESXi upgrade process forever.

Melissa is an Independent Technology Analyst & Content Creator, focused on IT infrastructure and information security. She is a VMware Certified Design Expert (VCDX-236) and has spent her career focused on the full IT infrastructure stack.

